Jail Writeup w/o Metasploit
Reconnaissance
Run the nmapAutomator script to enumerate open ports and services running on those ports.
All: Runs all the scans consecutively.
We have 6 ports open.
Port 22: running OpenSSH 6.6.1
Ports 80: running Apache httpd 2.4.6
Port 111: running rpcbind 2–4
Ports 2049: running NFS
Port 20048: running ****NFS mount daemon
Port 7411: running daqstream
Before we move on to enumeration, let’s make some mental notes about the scan results.
The version of OpenSSH running on port 22 is not vulnerable to any RCE exploits, so it’s unlikely that we gain initial access through this service, unless we find credentials.
The nikto and gobuster scans didn’t find any useful results for the web server running on port 80. So we might have to run more comprehensive scans.
The ports for NFS are open. We’ll have to check if there is any mountable directories and the permissions set on those directories. This is the first machine I work on that has the NFS service open, so this will be interesting!
Nmap was uncertain about the service categorization for port 7411. We’ll have to connect to it ourself using netcat and see the output that it gives us.
Enumeration
I always start off with enumerating HTTP.
Port 80 — HTTP
Visit the application in the browser.
Viewing the page source doesn’t give us anything useful. Let’s run a more comprehensive gobuster scan with a larger word list.
We get back the following result.
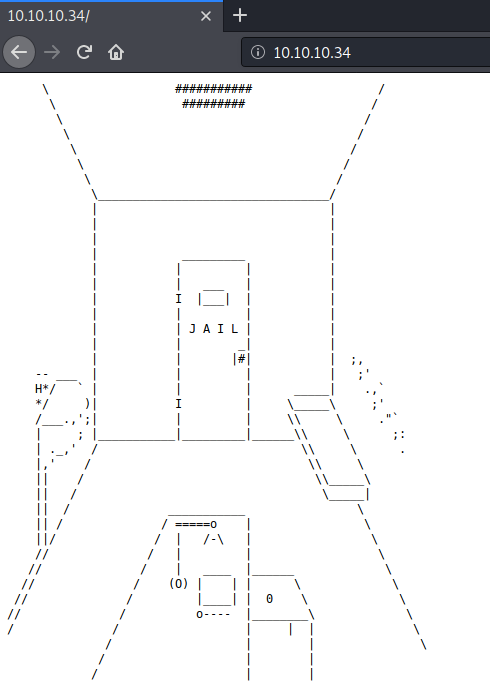
Visit the /jailuser directory. There we find another directory called /dev.
Download the files in the /dev directory to the attack machine.
— no-parent: do not ascend to the parent directory when retrieving recursively
— reject: file name suffixes to reject
-r: recursive
View the content of compile.sh.
The above script takes in the jail.c file, compiles it and outputs the file jail. Then it starts up the service. Notice that while it is compiling the file it sets the flag execstack which means that it is an executable stack. It’s very likely that we’re dealing with a buffer overflow here.
View the content of jail.c file.
We make note of a couple of things.
The program runs on port 7411 (that’s the port that nmap was not able to identify) and takes in as input a username and password. The input goes in the form of USER <username> and PASS <password>.
There are hardcoded credentials in the code: admin/1974jailbreak!. It doesn’t look like the application performs any useful functionality when using these credentials.
There is a debug option that outputs the memory address of the variable userpass.
The userpass field is vulnerable to a buffer overflow. We can see that it is allocated 16 bytes, however no input validation is done on the strcpy function and we can input up to 256 bytes.
Port 7411 — Jail
Let’s connect to the jail application and test out the credentials we found.
It doesn’t look it really does anything useful. Let’s test out the debug mode.
As mentioned earlier, it does give us the memory address for userpass which is the buffer overflow-able parameter.
Initial Foothold
To gain an initial foothold on the box, we’ll attempt to exploit the buffer overflow vulnerability.
Step #1: Crash the application (fuzzing)
The first step is to prove that the application is vulnerable to a buffer overflow. This can be done by sending a large number of characters as an argument to the application until it crashes. This is known as fuzzing.
Since the buffer is set to 16, we’ll need to use a number of characters larger than 16. Let’s go with 40. Use python to generate a string of 40 As.
Next, run the binary using GDB.
Then hit run to execute the program.
On a different tab, connect to the service.
Notice that we get a message in GDB telling us that the the process was detached after a fork from the child process. We can fix that by setting the following commands in GDB.
Now run the program again and connect to it using netcat.
We get the following output in GDB.
Perfect, it’s working properly right now. Next, add the username and password parameters.
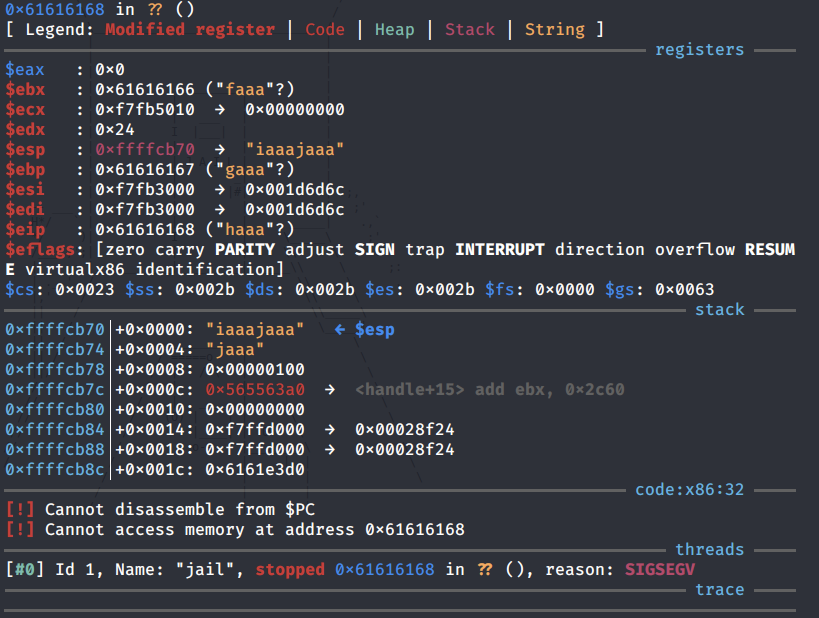
We get a segmentation fault in GDB.
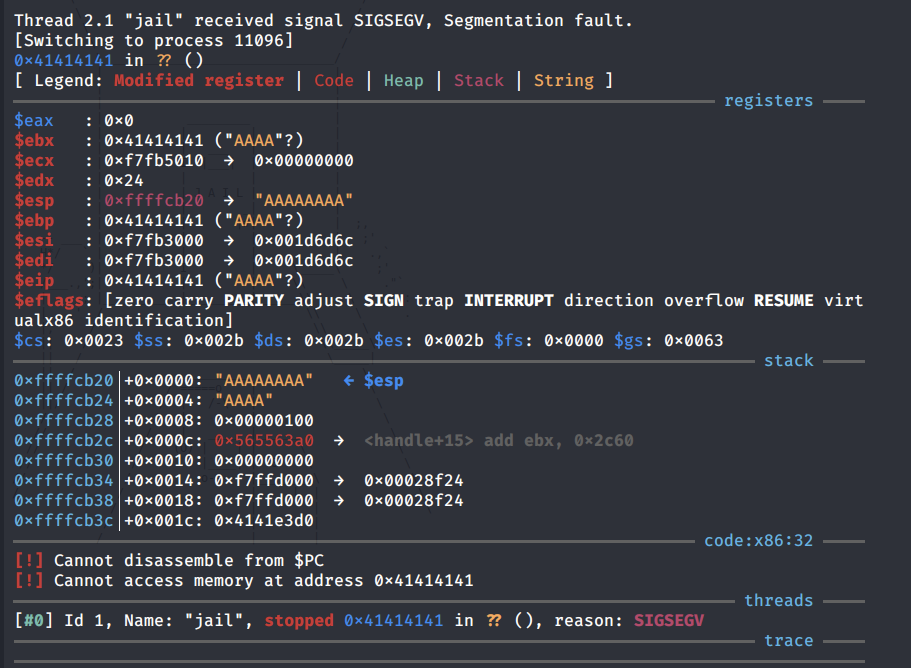
Looking at the output, we can see that we successfully overwrote the EIP (Extended Instruction Pointer) / return address with 4 As, therefore, confirming that the application is vulnerable to buffer overflow.
Step #2: Determine the security protections that are enabled on the application
This can be done using the “checksec” command.

We can see that PIE is enabled which stands for Position Independent Executable. This means that the memory locations will change every time you run the application. This makes exploiting buffer overflows harder. However, remember there was a DEBUG parameter that gave us the location of the buffer overflow-able field userpass. So we don’t have to worry about figuring out a way to find this memory address.
Step #3: Finding the offset
In step #1 we proved that we can overwrite the EIP by seeing that it was overwritten by a bunch of As. The next step is to find the exact memory address of the EIP. This can be done using pattern create.
Now perform step #1 again with the above password string. Make sure to use the DEBUG option.
We get a segmentation error.
The EIP was overwritten with the string “haaa”. To find exact memory address of the EIP, use the following command.
Perfect, the offset is 28.
Step #4: Finding Bad Characters
I originally didn’t do this step which caused me a lot of wasted time and the reason for that will become obvious in the next couple of steps. Looking at the code, we see that the characters “\x00” and “\n” are bad characters. By default, the null byte “x00” is always considered a bad character. The issue we face is with the “\n” new line character which is represented by an A (“\x0A”) in hex. And an “A” in decimal is a “10”. See where the problem is?
Our kali machine IP address has a 10 in it so any shell code that contains a reverse shell back to our kali machine will not work.
Step #5: Generating Shell code
The next step would be to generate the reverse shell code. Again, I hadn’t enumerated the bad characters when I first tried to solve this box and therefore I used the following msfvenom command to send a reverse shell back to my attack machine.
This gave me the following output.
Notice the “\x0a” added for my ip address that caused my exploit not to work. To bypass that restriction we’ll make use of socket reuse. We can simply grab the socket reuse shellcode on exploitdb instead of having to write our own.
Step #6: Writing out the Exploit
We have all the necessary information we need to write out our exploit. I use pwn tools to automate the process.
Run the exploit and we get a shell!
Now to test it on the Jail box, change the host to the ip address of Jail and the memory_add to the one that gets leaked when you connect to the jail application.
We’re in!
Privilege Escalation
Setting the difficulty of this box to Insane was not an overstatement. In order to root the box, we’ll have to pivot to two other users before we can escalate our privileges to root.
nobody -> frank
Let’s first upgrade our non-interactive shell to a partially interactive one.
Next, visit the home directory and view the permissions on the content of the directory.
The user.txt flag is probably in the frank directory. However, as stated by the permissions set on the directory, only the owner frank can view the content of the directory.
Next, let’s learn more about the OS.
View the list of allowed sudo commands the user can run.
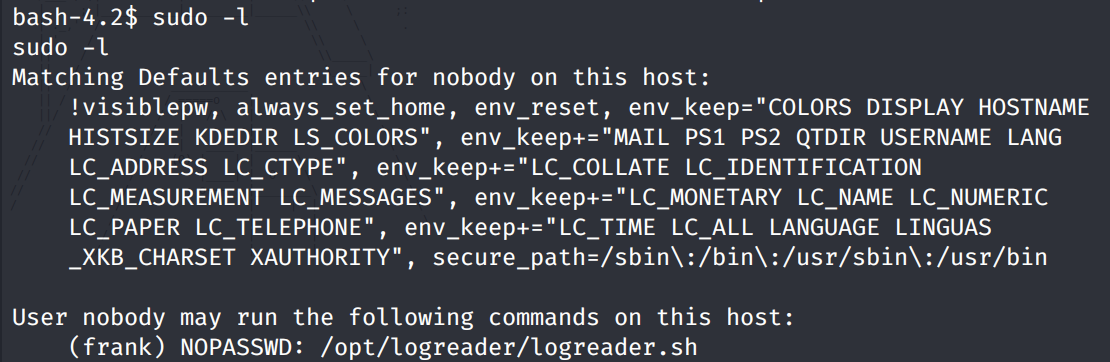
We’re allowed to run the logreader.sh file as the user frank without having to enter frank’s password.
View the permissions on the directory.
We don’t have any permissions. Next, let’s run the logreader.sh file.
We don’t get anything useful. Let’s move on. The nmap scan showed that the NFS ports were open and we never enumerated that service.
Going back to the attack machine, we can enumerate NFS services using NSE scripts.

Run the NSE scripts.
We get back the following result.
We can also enumerate this manually using the showmount command.
As shown above, we have two folders that we can mount to our attack machine. First create the directories opt and var.
Next, mount the NFS directories.
Let’s view the permissions on the directories.
The opt directory can be read and executed by anybody. View the content and permissions of the files in the opt directory.
We see the logreader directory that contains the logreader.sh file that we can execute as frank without a password. Let’s try and enter the directory.
We get a permission denied although our attack machine is running with the root id. This leads us to believe that root squashing is in place, which is default configuration for NFS. So not at all surprising. We’ll confirm that in a bit on the target machine.
As for the var directory, we only have execute permissions on it. However, the user id 1000 has write and execute privileges on the directory.
Let’s go back to the target machine and see which user has the 1000 user id.
It’s associated to the frank user. Next, let’s view the permissions set on the NFS share.
The configuration for both directories is the same.
Read and write privileges
The setting root_squash is configured which maps all requests from uid/gid 0 to the anonymous uid/gid. This is why we weren’t able to view the files although the attack machine was running with the uid/gid 0. When we made the request to view the file, our id got mapped to the anonymous id and our request got rejected.
More interestingly, the no_all_squash setting is configured which does NOT map all the requests from other uids/gids to the anonymous uid/gid. This again is the default setting for NFS shares.
To sum up, we can assume the identity of any user on the attack machine except for the root user which automatically gets mapped to the anonymous user.
Going back to the permissions on the NFS directories.
The id 1000 (frank) has write and execute privileges on the var directory. So what we’ll do is add the user frank on our kali machine and change his id to 1000.
Now we can enter the var directory.
So the attack vector is as follows. We have write privileges on the var directory. Therefore, what we’ll do is create a setuid program file in the var directory with the privileges of the frank user we just created. Next, we’ll execute the setuid program in the target machine and since it has the setuid bit set and the owner is frank, we should be able to pivot from the nobody user to the frank user.
Let’s first change our user to the frank user.
Next, create a file setuid.c with the following content.
This is similar to the program we used for the TartarSauce box. Then compile the program.
Set the setuid bit on the file.
Confirm the permissions on the file.
Perfect, frank is the owner and the setuid bit is set.
Going back to the target machine, execute the program.
We pivoted to the frank user! Grab the user.txt flag.

frank -> adm
View the list of allowed sudo commands the user frank can run.
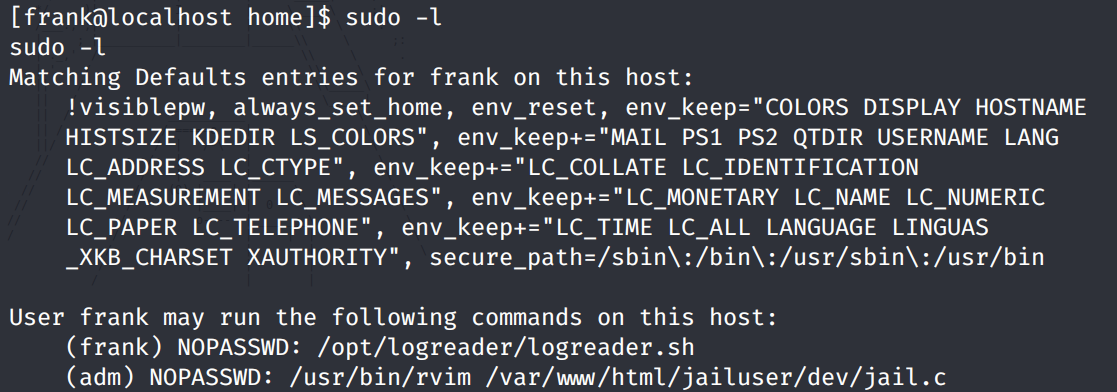
We can run one command as the adm user. Let’s test it out.
We enter an rvim shell displaying the jail.c file. We need to figure out a way to escape the shell.
Attempt #1.
We get the following error.
Attempt #2.
Same error.
Attempt #3.
It works! We pivoted to the user adm.
adm -> root
Let’s view the content of the adm directory.
View the content of the .keys directory.
View the content of note.txt.
I’m guessing the RAR file is password encrypted and the password is frank’s last name followed by 4 digits and a symbol as stated in the note.
Next, view the content of the .local directory.
The .frank file contains cipher text. I tested to see if it is encrypted using a shift cipher, but it’s not. Next, we’ll test it out on a tool called quipquip that automatically tests a bunch of ciphers.
We get a hit back!
After googling “Alcatraz escape”, I have a pretty good idea on what the password could be. One of the escaped prisoners is called Frank Morris. Since frank was a user on this box, and the escape was in 1962, I’m going to guess that the password is Morris1962!. And I just got why the box is called Jail!
Let’s transfer the keys.rar file back to our attack machine. To do that, check if netcat is installed on the box.
It is. On the attack machine, setup a listener to receive the file.
On the target machine, send the file to the attack machine.
It doesn’t seem to be connecting to my attack machine. Maybe it’s a firewall issue. Let’s transfer it in a different way. Base64 encode the file.
Then in the attack machine, base64 decode it and save it in the file keys.rar.
Now decompress the file with the password we guessed.
We get a success message and it decompresses the file.
We get a root public key. Before we try to crack it, let’s assume we didn’t get the hints about the password. In that case, you would hash the keys.rar file to a John the Ripper (JtR) acceptable format.
Save the hash in a hash.txt file.
Then try to crack it using JtR.
Alright, moving on. We found the following public key.
We’ll use the RsaCtfTool to try and recover the private key.
It cracks the private key! Change the permissions on the file.
SSH into the root account.
Grab the root.txt flag.

Lessons Learned
To gain an initial foothold on the box we exploited one vulnerability.
Buffer overflow vulnerability. The Jail service being used was vulnerable to a stack buffer overflow. This allowed us to execute shell code and gain access to the box. The root cause of the buffer overflow vulnerability was lack of input validation. The developer should have validated user input.
To escalate privileges we exploited four vulnerabilities.
Security misconfiguration of NFS shares. The NFS shares were readable and writeable. Therefore, as a remote attacker, we were able to mount shares and add malicious files to the shares that allowed us to pivot to another user (frank). The configuration of NFS shares should have followed the least privilege policy.
Security misconfiguration of user permissions. The user we pivoted to was configured to run the rvim command as another user. We used that security misconfiguration to run the command, escape the rvim shell and pivot that user (adm). Similar to NFS shares, the user permissions should have followed the least privilege policy.
Weak credentials. Now that we have access to another user’s directory, we enumerate the user’s files and find a RAR file that was encrypted with the user’s personal information and therefore was easy to crack. The user should have instead used a sufficiently long password that is difficult to crack.
Weak cryptographic key. After decrypting the RAR file, we found a weak RSA public key to the root’s account. From there we used a tool to recover the corresponding private key and SSHed into the root account. The issue here is not with the RSA algorithm but the parameter that the administrator had used as input to the RSA algorithm. For example, small key sizes, using smaller primes (p & q values), etc. The administrator should have used the guidelines listed in cryptographic standards that ensure secure configuration of the cryptographic algorithm results in strong keys.
Last updated